Sunday, March 4, 2012

A Blueprint For Art

This is a positive image of a contact print. The shape is of a decorative metal framework.

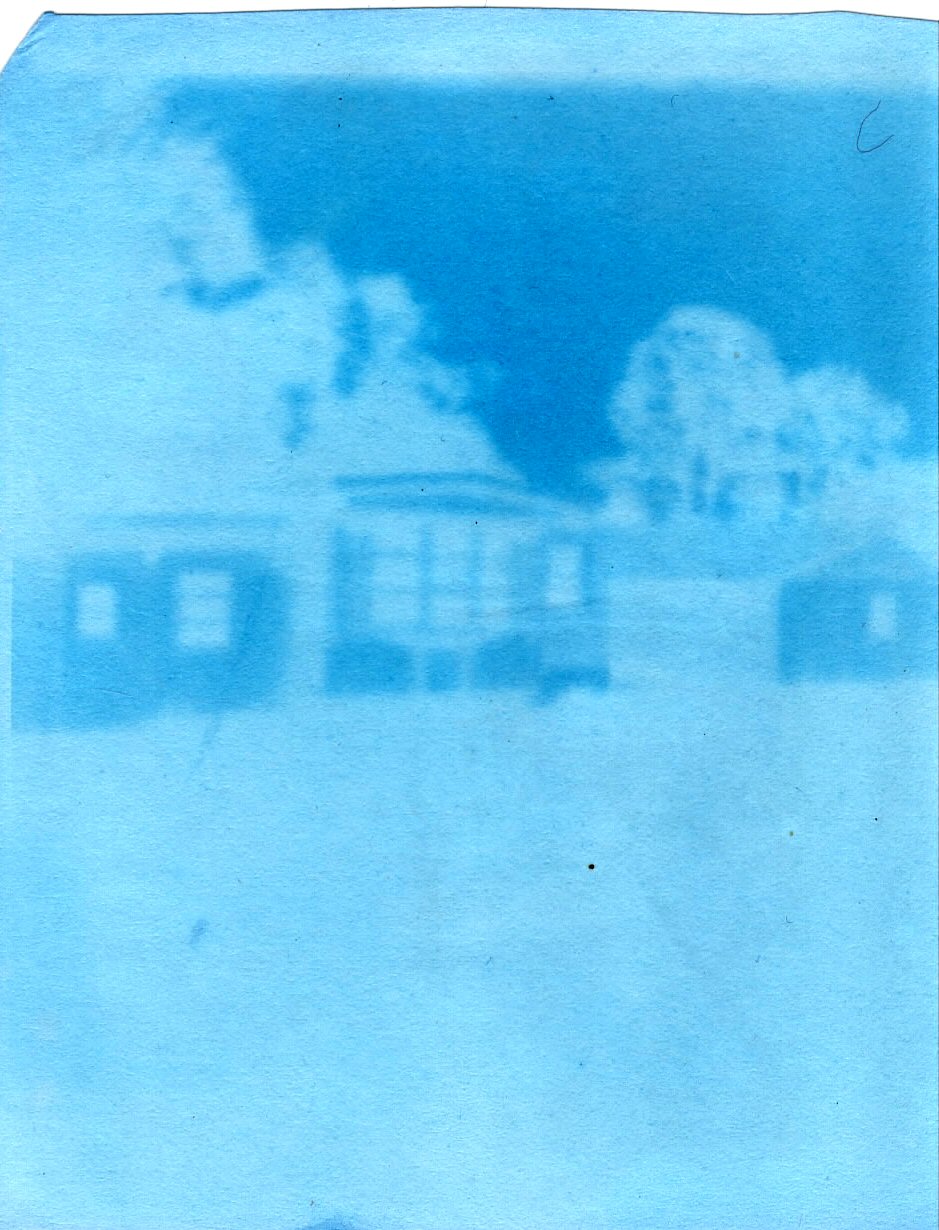
Since photography and art are both hobbies of mine, I always like to experiment with different methods, techniques, and materials. One of those materials is called Sunprint Paper. Its very similar to blueprint paper. A light sensitive chemical is applied to paper, which when exposed to sunlight, changes from blue to white. By laying objects on the paper, only the areas exposed to the light change color. The image is fixed using plain tap water.

The process has been around for over a hundred and fifty years. Its called a Cyanotype. Cyan for the color blue it produces in the negative. The paper is only sensitive to UV light, so is easy to work with indoors (No darkroom required). The sensitivity of the paper is not very high, so it takes several minutes to produce a contact print. Originally contact prints were flowers and plants, since they are somewhat translucent to sunlight and a lot of detail shows in the image. But many other objects can be used to make cyanotypes as well.

To make a positive image, I scan the fixed image into the computer and use the negative image tool in my software to reverse the contrasts. The result is a nice Sepia tone. Recently though, I wondered if this paper would work in a camera. I knew the exposure times would be hours because it wasn't a direct contact print. I also knew that the subjects I took pictures of would have to reflect a good amount of UV or they wouldn't show up in the image. So I began to experiment.

I converted an old Polaroid camera to work with the paper. I started by cutting the paper to a size that would fit an empty polaroid cartridge. Next I removed the shutter mechanism from the camera so that it was open all the time. To control the exposure, I simply loaded the cartridge, and folded the flash down so that it covered the lens. After setting it up outside, I would flip the flash up and expose the paper. The results show that it is possible to get an image, though it does take hours of exposure time (A minimum of three). The images are very soft and when processed into the sepia positive, have a very dreamy appearance. Sometimes they look as if they're hundred and fifty year old daguerreotype's. I like the artistic quality of it. So here are some prints I've produced using both contact exposure and in camera exposure. I've included both negative and positive images.

This image is a contact print using a jumble of drill bits as a subect.


Friday, February 24, 2012

Brace Yourself! This Is Not A Drill. Or Is It?


Actually its both. For those of you who are too young to remember, this is a hand brace aka brace and bit, bit brace, etc. This is what your fathers and grandfathers used before they invented electric and cordless drills. This particular model is a Stanley #965 10" brace I picked up at a second hand store for $5. Don't be fooled though, these tools are amazing. They drill nicer holes than an electric model, and unless your using a large auger bit, you can drill a hole without breaking a sweat. These tools also make awesome screwdrivers. My cordless will sometimes fight and fight to drill or screw into certain materials, but the brace makes it easy.

So now your asking, whats the DIY here? Well, I'm going to restore this brace. Notice the dark patina? Thats rust! Though the wooden handles are fine and the chuck and ratchet mechanism work fine, the overall condition is bad. I debated whether or not to restore it versus leaving it that way, but finally decided that since I would probably use it a lot, I didn't want the rust to eventually destroy it. So, heres what I did.

STEP 1: CLEANING


To start, you must remove the handle from the top of the brace to protect it from the other chemicals and so that you can reach all parts of the brace. The handle is held on by two small screws on the underside. Once these are removed, I found that the handle itself was threaded and so unscrewed it from the frame. So basically the two screws are just there to prevent it from spinning itself off..


I began by thoroughly cleaning the brace with degreaser. This will get all the crud in all the hard to reach areas.

Then I went back with a wire brush and removed any excess left behind by the chemical.


STEP 2: RUST REMOVAL

After wiping the brace dry, I began applying a derusting gel. You should always wear gloves and use a brush when applying the gel. Be careful of spills and rinse the gel off if you get it on your skin. It took quite a few coats to get down to bare metal. More than I expected actually. Usually this gel works in one or two coats, but I ended up reapplying it about ten times. The first few coats were left on for 15 minutes as per the directions and then wiped dry. The remaining coats were left on for 30 minutes each. Finally, I got back to bare metal. Even then I had to go back with steel wool to get rid of excess material.


 STEP 3: FINISHING

I finished off by adding some metal polish. I wiped it on like you would on your car, and then wiped it back off after a few minutes with a clean rag. The last step is to put the wooden handle back on.


And here is the result.  It took a lot of blood, sweat, and tears, but after several hours of work, A rust free tool with many good years of life left in it appeared.

Wednesday, February 15, 2012

Thor's Hammer

Ok, so its not actually a hammer, Its a mallet. A wooden mallet works good for tapping wooden parts together, such as mortise and tenon joints, dovetails, etc. Also work good when used with chisels. They don't leave a bunch of hammer marks on the materials. This mallet is the first tool I've ever made by hand.

I started with some scraps of leftover 2 x 4. Since lumber tends to be pine or spruce, its a pretty soft wood, so I wouldn't say its the best to use, but its what I had. Cutting the head was straight forward. Just a 5" section of lumber cut from the board. The handle was cut down from a 12" length of board to about 7". Then I took the shortened piece and split it in half. So I had a handle that was 7" x 1-3/4". The next step is the fun part. I had to make a mortise and tenon joint. The mortise was cut in the head of the mallet using a 1/2" drill bit and a chisel to square the edges and smooth everything out. The mortise for a mallet normally go's all the way through, but I decided to cut mine to about 2" deep. The next step was to make the tenon in the handle. I started by transferring marks from the mortise to the handle so I could accurately trim it down. It takes several cuts to make a tenon. I used a Japanese style handsaw that cuts only on the backstroke. It takes both cross cuts and rip cuts to trim it to size. After doing a test fit, I applied carpenters glue to the mortise and tapped the handle back in. After it dried I could start on the finish work.
Example of Mortise and Tenon joint


At this point I had a working mallet, but not a very nice one. So the next step was to sand down all the edges of the head until they were smooth and rounded off. Then I used a knife to carve the handle into a comfortable shape and finished off by sanding it as well. So there you have it. How to make a mallet out of a scrap of wood.

Sunday, February 12, 2012

This Old Bird House

I'm sure almost everyone has built one in school or at home as a child. I've built several over the years. All have been run of the mill designs though. This one is no different. I have plans to make more complex designs later on down the road, but for now this will do. The house is more decorative since I didn't include a way to clean it out every season.

One thing I like to do is build my bird houses out of repurposed materials. This one was made from some old Oak 1 x 4's that I found lying around in the storage building out back. Most were badly warped, but there was just enough straight material for the project. The house measues 10" tall and 4-1/2" deep and wide. The perch is 3/8" doweling. The hole was drilled using a 1-1/4" hole saw on my drill. The house is put together using carpenters glue and finish nails.


The house to the right is one I built about six years ago from boards from an old barn door.

I finished off the house by giving it an aged look. I wanted it to look like it had already been out in the weather for twenty years. I started by staining it using Dark Walnut. Normally your suppose to wait 15 minutes, wipe the excess, and then wait about four more hours and apply a second coat if necessary. In this case however, I used a different technique to get the look I wanted. I applied a coat, wiped the excess, waited five minutes and then applied another coat. I did this a total of six times. It sounds excessive, but I wanted to make sure that as much as possible would soak in. After the final coat, I let it dry for about four hours. Then I went back and sanded it, first with a heavy grit and then with a fine grit paper.  The result is a bird house that is worn and distressed and looks like its been sitting outside for twenty years.

Friday, February 10, 2012

Coming soon!

New articles coming soon, including several woodworking projects. I'll post them as they progress.

-Mark Gilbreath

Saturday, February 4, 2012

Map Quest

I found a plain white globe light fixture at the second hand store the other day. It had a diameter of about ten inches across. I had been looking for just such a fixture for a globe map project I had been wanting to do. In this case I decided not to use it as a light fixture and removed the bulb and wire, leaving just the globe.

Next I wanted to make it look like an antique map, so I went to Michaels and found some nice sepia toned paper. I had to apply it in very narrow strips since the paper was of a very heavy stock and the compound curves were a challenge. This is were my automotive pinstriping and decal experience came in handy.

After finishing the first layer, which was going to represent the oceans, I went online and found a world map with some of the same color tones. I printed it off and cut out the continents. Since printer paper is thinner than the other I was using, I was able to get it to lay down much better on the round shape by cutting slits every few inches so that the paper could bend with the curves.


The last step is to put a finish coat of glue over the top and make a stand for it to sit on. This project was challenging, but the end product was very rewarding.

Tuesday, January 31, 2012

Outside The Box


 I hate to throw things away before trying to think of how to reuse them. Take for example this box. I bought a new cash box to keep change in and was getting ready to throw the box it came in out, but decided not to. Its a thick sturdy cardboard so I decided to keep it. I was looking for something to keep receipts and loose papers in anyway. Of course the boxes advertising wasn't exactly attractive, so I remedied that. Its a bit loud, I know, but I made it from what I had. Better than nothing I say. :)